-
7.3 커스텀 태그와 ELJSP 2023. 9. 7. 12:39
1. 커스텀 태그 Custom Tag : 사용자 정의 태그
- 스크립트릿 사용 대신 태그와 같은 형태로 자바 코드를 저장해 태그 라이브러리로 활용
- HTML 태그 구조이지만 서블릿 형태로 변환될 때 자바 코드로 변경됨
- taglib 지시어를 통해 커스텀 태그가 어디에 정의되어 있는지를 선언 및 태그에 사용할 접두어 지정
<%@ taglib tagdir="/WEB-INF/tags" prefix="myTag"%>

...

<h4><myTag:print /></h4>
WEB-INF/tags 폴더 아래 print.tag 파일
<%@ tag pageEncoding="UTF-8" %>

커스텀 태그 출력 메시지: Hello, World!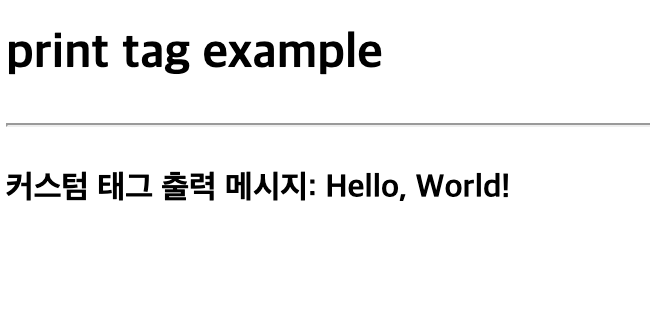
2. EL Exptrssion Language : 표현 언어
- 현재 페이지의 자바 객체 혹은 scope object(application, session, request, page 등)에 저장된 자바 빈 객체를 손쉽게 접근 및 사용
- 데이터를 표현하기 위해 설계되었지만, 제한된 객체 참조가 가능하며 해당 객체의 메서드 호출도 가능
- 단순 출력 외에 사칙연산, 비교연산, 논리연산, 3항연산 등을 지원
- 간단한 구문으로 손쉽게 변수와 객체를 참조할 수 있다
- 데이터가 없거나 null 객체를 참조할 때 에러가 발생하지 않는다.
[EL Example]
먼저 아래와 같이 elTest.jsp 파일을 만든다.
<%@ page contentType="text/html; charset=UTF-8" %> <% pageContext.setAttribute("pageScopeElTest", "pageContext storage value!"); request.setAttribute("requestScopeElTest", "request storage value!"); session.setAttribute("sessionScopeElTest", "session storage value!"); application.setAttribute("applicationScopeElTest", "application storage value!"); %> <!DOCTYPE html> <html> <head> <meta charset="UTF-8"> <title>elTest.jsp</title> </head> <body> <h2>EL Test</h2> <hr /> <form method="GET" action="elTestResult.jsp"> <fieldset> <legend>EL Test</legend> <label for="name">[이름]</label> <input type="text" name="name" id="name" /><br /> [관심분야] <label for="favorite1">정치</label> <input type="checkbox" name="favorite" id="favorite1" value="정치" /> <label for="favorite2">경제</label> <input type="checkbox" name="favorite" id="favorite2" value="경제" /> <label for="favorite3">사회</label> <input type="checkbox" name="favorite" id="favorite3" value="사회" /> <label for="favorite4">문화</label> <input type="checkbox" name="favorite" id="favorite4" value="문화" /> </fieldset><br /> <input type="submit" value="제출" /> </form> </body> </html>- 다음은 elTestResult.jsp
- 표현식을 활용한 예제 먼저
<%@ page contentType="text/html; charset=UTF-8" %> <!DOCTYPE html> <html> <head> <meta charset="UTF-8"> <title>Insert title here</title> </head> <body> <h2>El Test Result</h2> <hr /> <h3>표현식을 사용해 출력</h3> <h4>pageScopeElTest: <%=pageContext.getAttribute("pageScopeElTest") %></h4> <h4>requestElTest: <%=request.getAttribute("requestScopeElTest") %></h4> <h4>sessionScopeElTest: <%=session.getAttribute("sessionScopeElTest") %></h4> <h4>applicationScopeElTest: <%=application.getAttribute("applicationScopeElTest") %></h4> <h4>name: <%= request.getParameter("name") %></h4> <h4>favorite1: <%= request.getParameterValues("favorite")[0] %></h4> <h4>favorite2: <%= request.getParameterValues("favorite")[1] %></h4> </body> </html>- EL을 활용한 예제
	<h3>EL을 사용해 출력</h3>
	<h4>pageScopeElTest: ${pageScope.pageScopeElTest}</h4>
	<h4>requestElTest: ${requestScope.requestScopeElTest}</h4>
	<h4>sessionScopeElTest: ${sessionScope.sessionScopeElTest}</h4>
	<h4>applicationScopeElTest: ${applicationScope.applicationScopeElTest}</h4>
	<h4>name: ${param.name}</h4>
	<h4>favorite1: ${paramValues.favorite[0] }</h4>
	<h4>favorite2: ${paramValues.favorite[1] }</h4>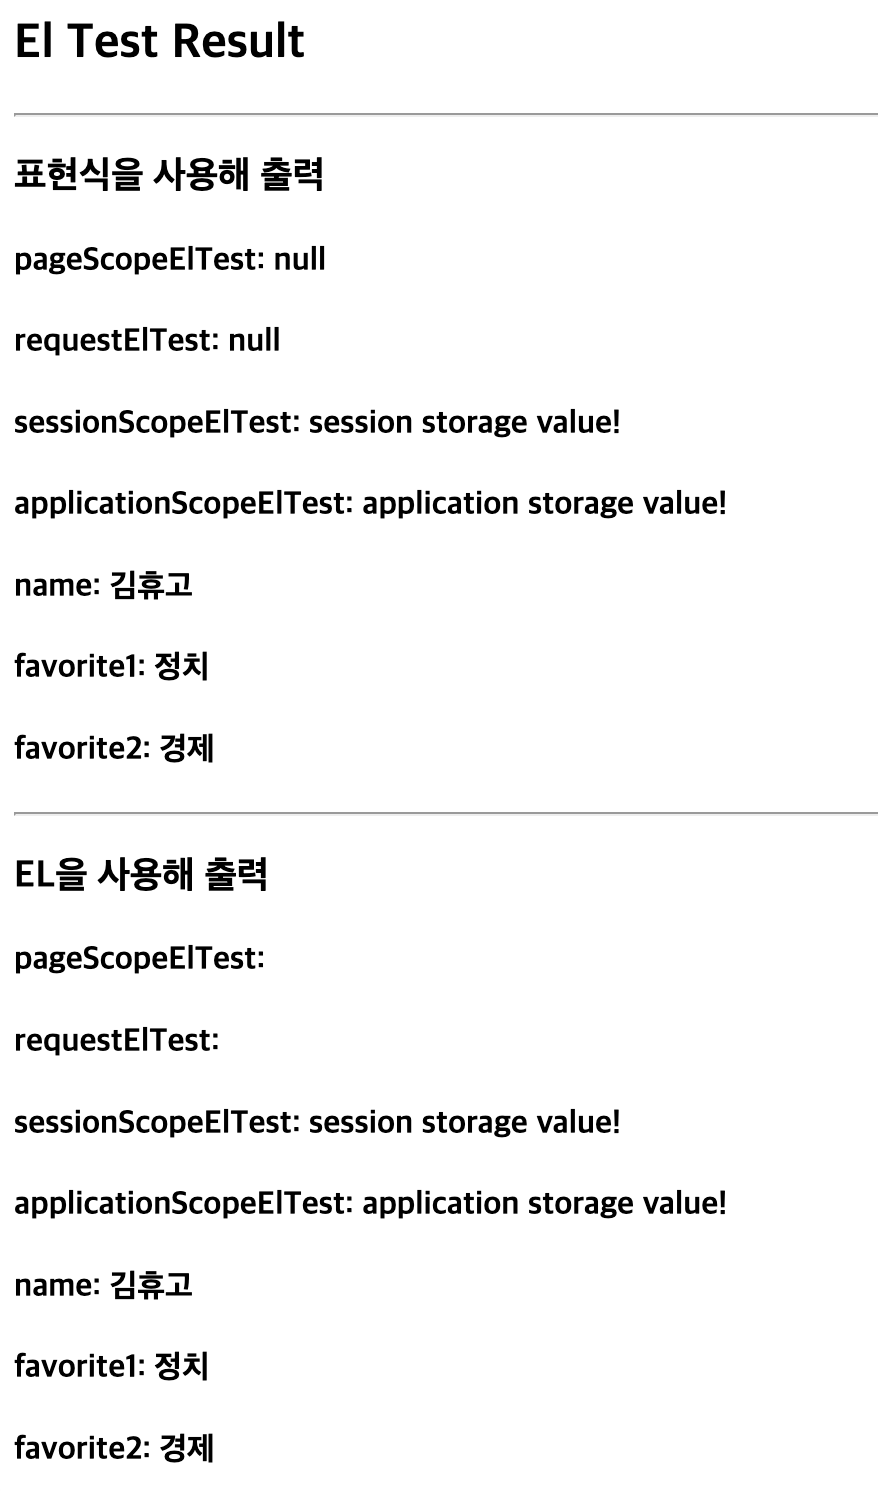
EL에서는 null이 나오지 않고 예외처리 되어 무시된다. <h3>EL을 사용해 출력2</h3> <h4>pageScopeElTest: ${pageScopeElTest}</h4> <h4>requestElTest: ${requestScopeElTest}</h4> <h4>sessionScopeElTest: ${sessionScopeElTest}</h4> <h4>applicationScopeElTest: ${applicationScopeElTest}</h4> <h4>name: ${param.name}</h4> <h4>favorite1: ${paramValues.favorite[0] }</h4> <h4>favorite2: ${paramValues.favorite[1] }</h4>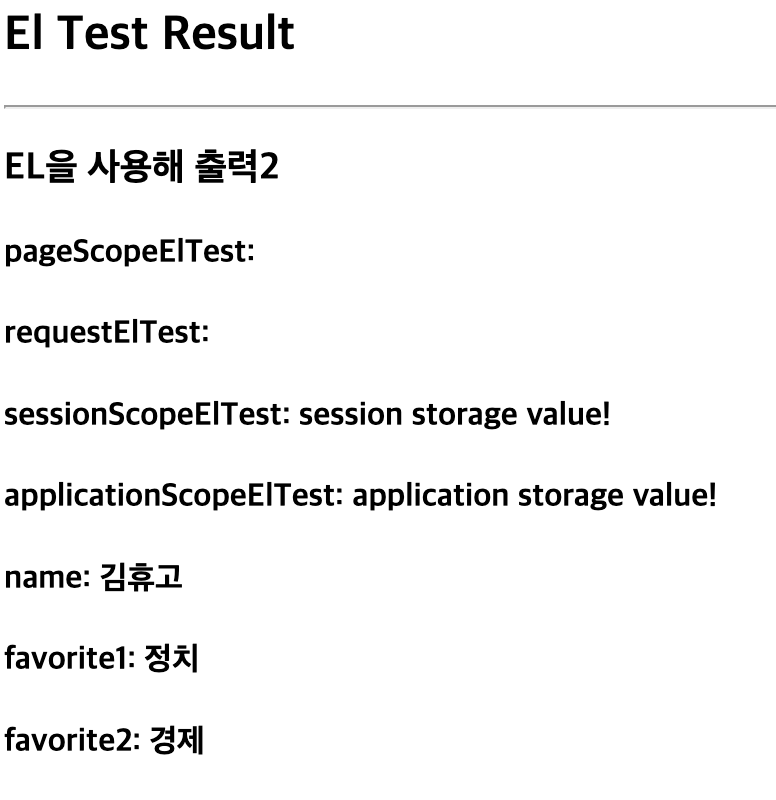
명시적으로 객체를 입력해주지 않아도, 저장소를 뒤져서 해당 항목명을 찾는다. 쿠키도 써보자. elTest.jsp에 다음과 같이 변경
<%
	Cookie cookie = new Cookie("elCookie", "EL_Test_Cookie");
	response.addCookie(cookie);
%>
elTestResult.jsp
<h4>${cookie.elCookie.name} : ${cookie.elCookie.value}</h4>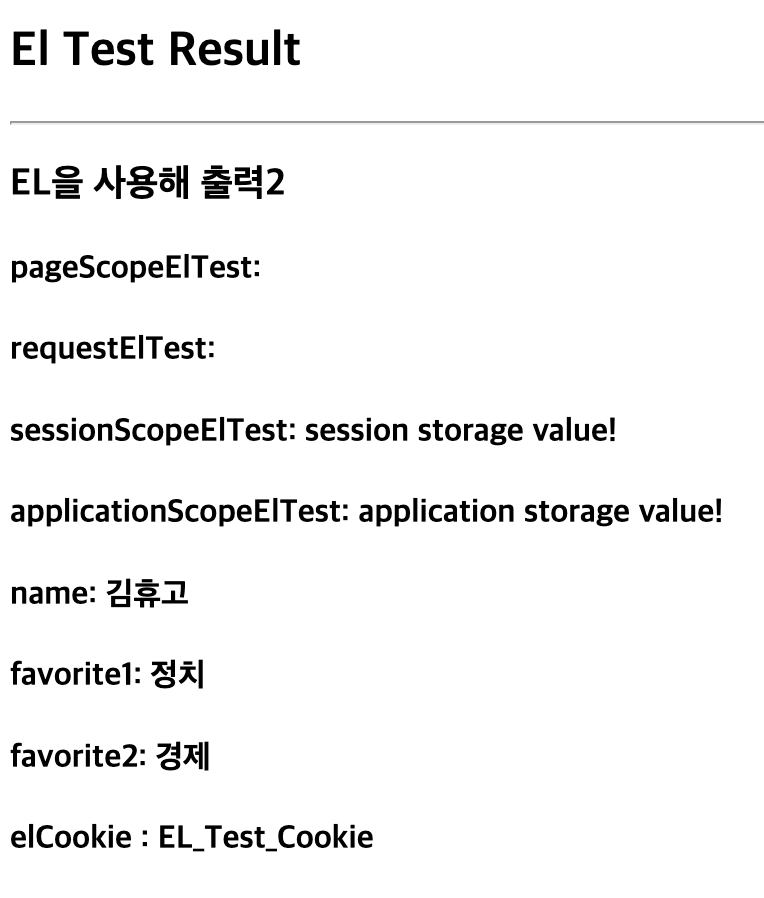
<%
	String myName = "KimHugo";
%>

...

<h4>myName: ${ myName }</h4>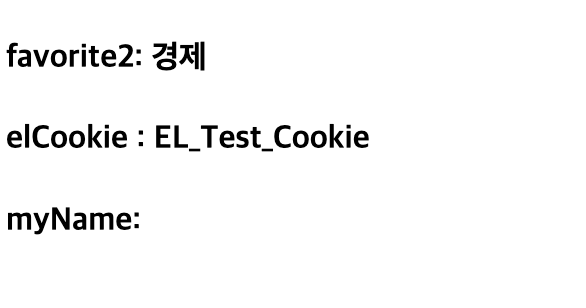
EL에서는 로컬변수를 출력할 수 없다. [EL로 JAVA Beans 객체 활용하기]
먼저 elBeansTest.jsp 파일
<%@ page contentType="text/html; charset=UTF-8" %>
<jsp:useBean id="product" class="chap07.Product" scope="session" />

<%
	String[] productList = product.getProductList();
	String items = "";
	for(String prod : productList) {
		items += "<option>"+  prod + "</option>";
	}

	pageContext.setAttribute("items", items);
%>
<!DOCTYPE html>
<html>
<head>
	<meta charset="UTF-8">
	<title>elBeansTest.jsp</title>
</head>
<body>

	<h2>EL Bean Test</h2>
	<hr />

	<form method="POST" action="elBeanResult.jsp">
		<fieldset>
			<legend>상품선택</legend>
			<select name="product">
				${ items }
			</select>
			<input type="submit" value="전송">
		</fieldset>
	</form>

</body>
</html>
다음은 elBeanResult.jsp 파일
<%@ page contentType="text/html; charset=UTF-8" %>
<!DOCTYPE html>
<html>
<head>
	<meta charset="UTF-8">
	<title>elBeanResult.jsp</title>
</head>
<body>
	<h2>EL Bean Result</h2>
	<hr />

	<h4>product: ${ param.product }</h4>
	<h4>num1: ${ product.num1 }</h4>
	<h4>num2: ${ product.num2 }</h4>
	<h4>productList1: ${ product.productList[0] }</h4>
	<h4>productList5: ${ product.productList[4] }</h4>

</body>
</html>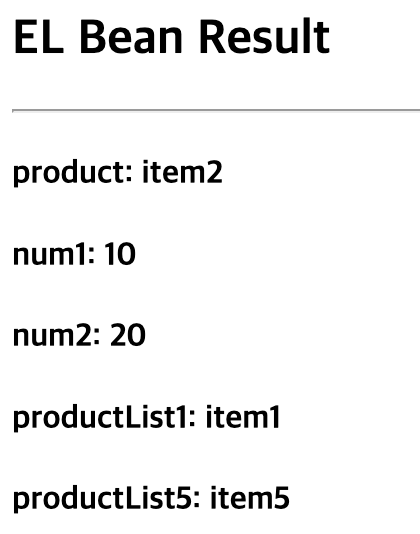
useBean 에서 scope를 session으로 선언했기 때문에
다른 페이지로 넘어갔을 때도 불러온 빈즈 객체를 사용할 수 있다.
'JSP' 카테고리의 다른 글
7.1 JSP 응용 - 액션태그 | INCLUDE 지시어, 액션으로 페이지 구조 만들기 (1) 2023.09.01 JSP파일에서 활용가능한 주석들 : HTML, JAVA, JS, CSS, JSP (0) 2023.08.31 6. JSP의 기초 다지기 (0) 2023.08.31